"Water is Life"
El Agua es Vida—water is life—is an old New Mexico saying. Even in such arid country, a hiker's approach to water overlaps a lot with approaches used in wetter parts of the world. For day hikes, pretty much anywhere in the wilds, the safe approach is to pack all the water you will consume.
For a day hike in New Mexico, I recommend that you never start with less than two liters of water. Not only in case you're out longer than planned, but so you can share with someone who didn't plan as carefully. On a long, hot day and an in-and-out hike, I sometimes also take along an extra liter or two and cache that water partway along the trail for the return trip. If the parking spot for the hike is a remote one, I'll have more water back at the car. That way, if I get back to the car after drinking my day's supply and the car won't start, I'll have water as I go for help or as I wait for help to get to me.
(If you think this much water is excessive, please read my blog about an all too common type of tragedy in the desert Southwest.)
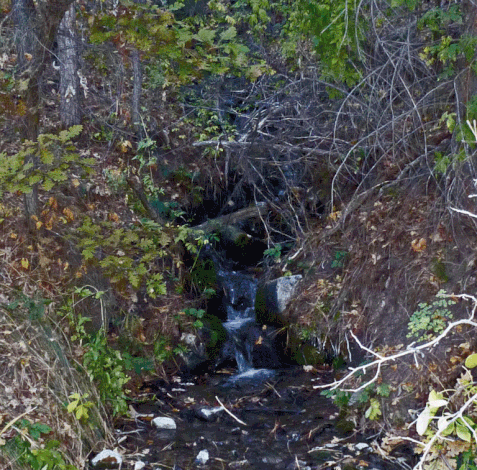
Have a backup plan in case something happens to your trail supply (you knock over an open water bottle, for example). In New Mexico you may find small amounts of water in a pothole in the bedrock, or in a muddy pool in a stream bottom, or even in a cattle tank, but it's not fit to drink without prior treatment. REI has an excellent guide to water treatment here, including the important distinction between filtering water and completely purifying it. I'll summarize what has worked for me.
Boiling water is an excellent way to purify it, but that assumes that you can start a fire and have something to boil water in. One alternative is chlorine dioxide tablets; they weigh almost nothing and take up almost no space, so you can take along enough to purify many liters of water. The big down side is that once you dose your water, you need to wait at least half an hour (and to be quite safe, four hours!) to drink it. On remote hikes I carry the gear to allow both approaches, as I describe on a separate page. Still, it's nice to be able to come up with drinkable water right away. By the time you find a source of emergency water, you can be very thirsty!
Even on a less remote hike, I like to have a backup. If you're in New Mexico and low on water, filtration can be enough. The trick is to have a filter that will take out the protozoa and bacteria, even if viruses can get through (in New Mexico water-transmitted viruses generally aren't a problem). I just switched to the Katadyn BeFree water filter for hikes; before that I used a Sawyer Mini and before that I used a LifeStraw. All three are described below.
The Katadyn BeFree is light (2.4 ounces or 68 grams), can be folded to fit in a jacket pocket, and produces a liter of drinkable water in less than two minutes. Cleaning the filter is easy; you can just swish it in your water source. The one warning I'll provide is that you should read the directions. In particular, be aware that if you hold the filter sideways under running water, in an attempt to clean it, you can damage the filter. The filter and squeeze bag cost $40 U.S., and after about 250 gallons you need to replace the filter ($25). In contrast, the Sawyer Mini I used previously is good for about 100,000 gallons—meaning that if you use the Mini for hikes, one should last you the rest of your life.
If you want to see my YouTube comparing the BeFree and the Mini, please click here. So if the BeFree costs more than the Mini and doesn't last as long, why did I switch? In a word, speed. Once you fill the pouch with water and start squeezing, clean, drinkable water comes pouring out.
The main reason to use a good filter is to not get diseases such as giardia. (I did get that once, and will go to great lengths to never get it again.) But you also get clearer, better tasting water. Let's look at the next photo, which shows the same jar with three different water samples.
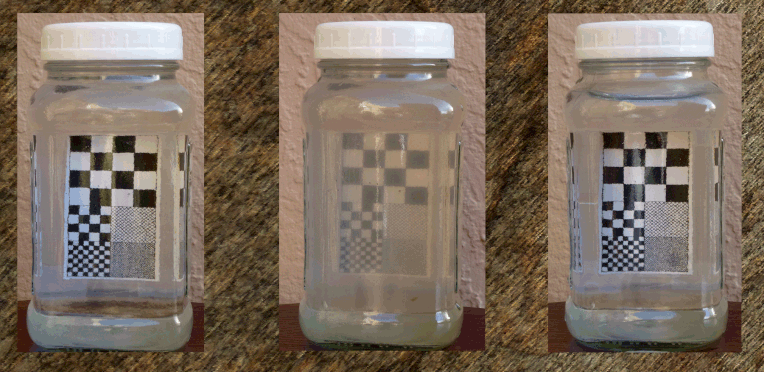
There's a grid taped to the back of the jar, to help you see how opaque the water is. The sample on the left is tap water and sure enough, you can see right through the jar. The sample in the middle is untreated pond water and you can see that it's somewhat turbid. The sample on the right is the same pond water after it's been passed through the BeFree filter. As you can see for yourself, the pond water is now as clear as tap water.
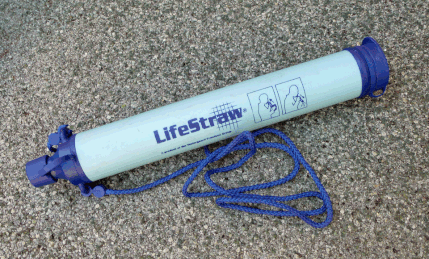
The LifeStraw shown to the left measures about 9 inches (22 centimeters) long and 1 1/4 inches (3 centimeters) in diameter. It weighs 2.7 ounces (77 grams). It comes with a lanyard so when in survival mode, you can hang it around your neck. The ends have caps so you can throw it in the bottom of your pack.
When it's needed you open the ends, dip one end in the contaminated water, and suck like you would on a straw. You can get on your belly to suck water out of a stream or pool, but it's easier to scoop up water in a cup or wide-mouth water bottle and drink while sitting upright. If the filter clogs, blow on the clean end to clear it.
I've seen criticisms that a LifeStraw doesn't allow you to produce clean water to store in your pack. True, but in need you can fill your empty water bottles with unclean water and use the LifeStraw to consume the contents. Just be sure to mark the bottles used this way, so you know to decontaminate them before filling them with clean water.
Sucking water through one of these gizmos can be slow and a bit difficult. Also, each is rated for only 1,000 liters (264 gallons), so it's not a long-term solution to your clean water needs. But as small, light, and cheap as it is, and as simple as it is to use, it's a great backup for day hikes.
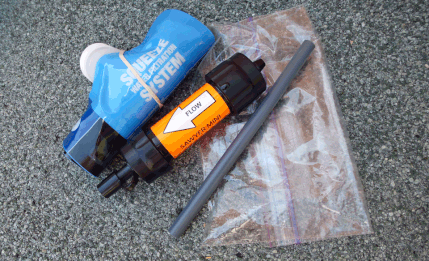
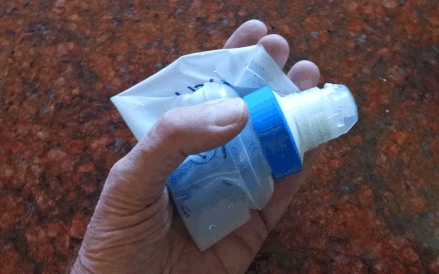
I used to rely on a Sawyer Mini. My setup shown in the picture, including a quart zip bag to carry the kit, is about 6 1/2 inches (16 1/2 centimeters) square and weighs 2.8 ounces (79 grams). For the same weight as the LifeStraw, and for a modest increase in price, you get greater flexibility. If you attach the included straw to the dirty water end, you can drink directly from dirty water. You can also fill the included pouch (and many water and soda bottles) with dirty water and drink bota style. What I like best is, I can use the filter to refill my Nalgene bottles with clean water. The Mini is rated for 100,000 gallons (more than 350,000 liters), so you don't need to worry about overuse. The kit comes with a syringe for flushing the filter, but on a day hike or short overnighter you can leave that at home. The filter can be damaged by freezing, so in cold weather you need to carry it next to your body.
The complaints I've seen are mostly about the size and durability of the included pouch and the difficulty of filling it. I agree that the 16 fluid ounce (0.5 liter) pouch is too small for serious production of clean water, but if you use the system as a backup and not for a regular water supply, that shouldn't be a worry. If it it is anyway, the 32 ounce (1 liter) pouches are cheap enough. Also, to prevent damage to the pouch, squeeze gently. In fact, you don't need to squeeze at all; it's easy to modify the system for gravity flow, as I describe here and show in this video.
Also, a great way to fill the pouch is to collect water in a zip bag (such as the one you use to hold the kit) and pour the water into the pouch from there. A zip bag will collect water from almost any source, including the barest of trickles.
If you use the Mini to produce water during overnight hikes, you might wish to go with the slightly more elaborate, gravity-fed setup I link to above. But as a backup system for day hikes, the kit shown above should be plenty.
If the water you're using is full of organic gunk or sediment, you can "pre-filter" the water. In one of my blogs I describe an experiment involving three different approaches to pre-filtering.